PyFluentを使ってみた(その1)
By M.Sato
はじめに
Ansys Fluent v2022R2には新機能としてPyFluentが実装されました。
これは pythonからfluentを呼び出すための実行環境になっており、pythonで 使用可能なモジュールを呼び出して、fluentの計算結果を処理するなどの操作が可能になるようです。
そこで一度どのようなものか調べてみました。
参考にしたURLは以下です。
使用するための準備
PyFluentは、python内からFluentを呼び出します。 従ってまず、pythonが使えるようにしておくことが必要です。
簡単にインストール手順を示します。
pythonのインストール
まず最初に、pythonをインストールします。
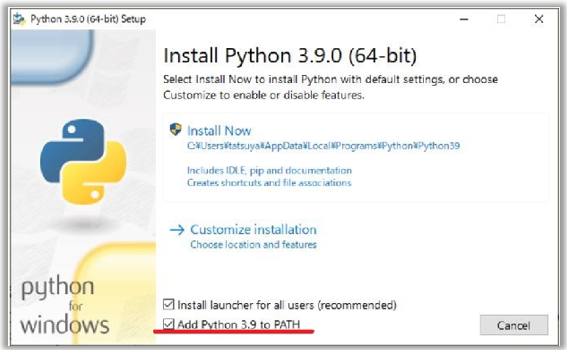
PyFluentでサポートしているバージョンは、python 3.7からpython 3.10ということなので適切なバージョンを以下のURLからダウンロードして インストーラを実行します。なお、コマンドプロンプトからpythonを実行するので、下図に示すようにPATH変数の追加をチェックしておきます。
関連するモジュールのインストール
pythonでよく使用する数値計算用ライブラリ(numpy)、作図用のライブラリ(matplotlib)などを予めインストールしておきます。
これらは pipコマンドでインストースルします。
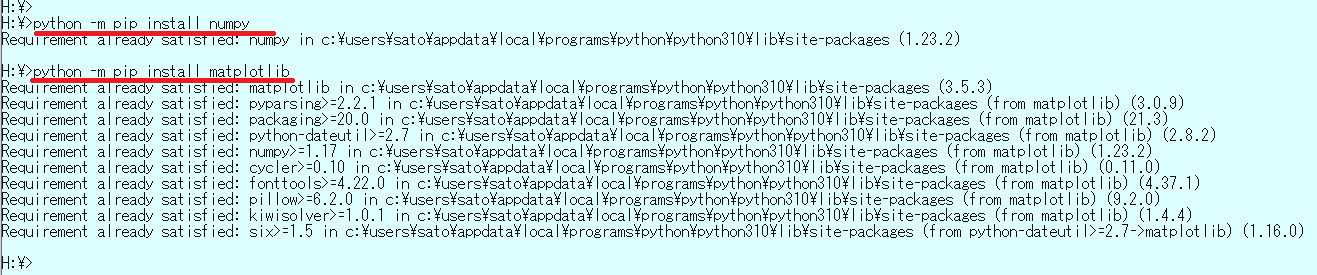
コマンドプロンプトを開き、以下に示すようにコマンドを入力します。
(以下の例では python -m pip ...となっていますが、 多分python -mの部分はなくても可)
python -m pip install numpy
python -m pip install matplotlib
pythonの起動を確認
コマンドプロンプトから、pythonと打ち込むとpythonの対話実行画面が起動するはずです。
ここでimport numpyなどを入力してモジュールが正常にインストールされていることを確認してください。
エラーメッセージが出なければOKです。

PyFluentのインストール
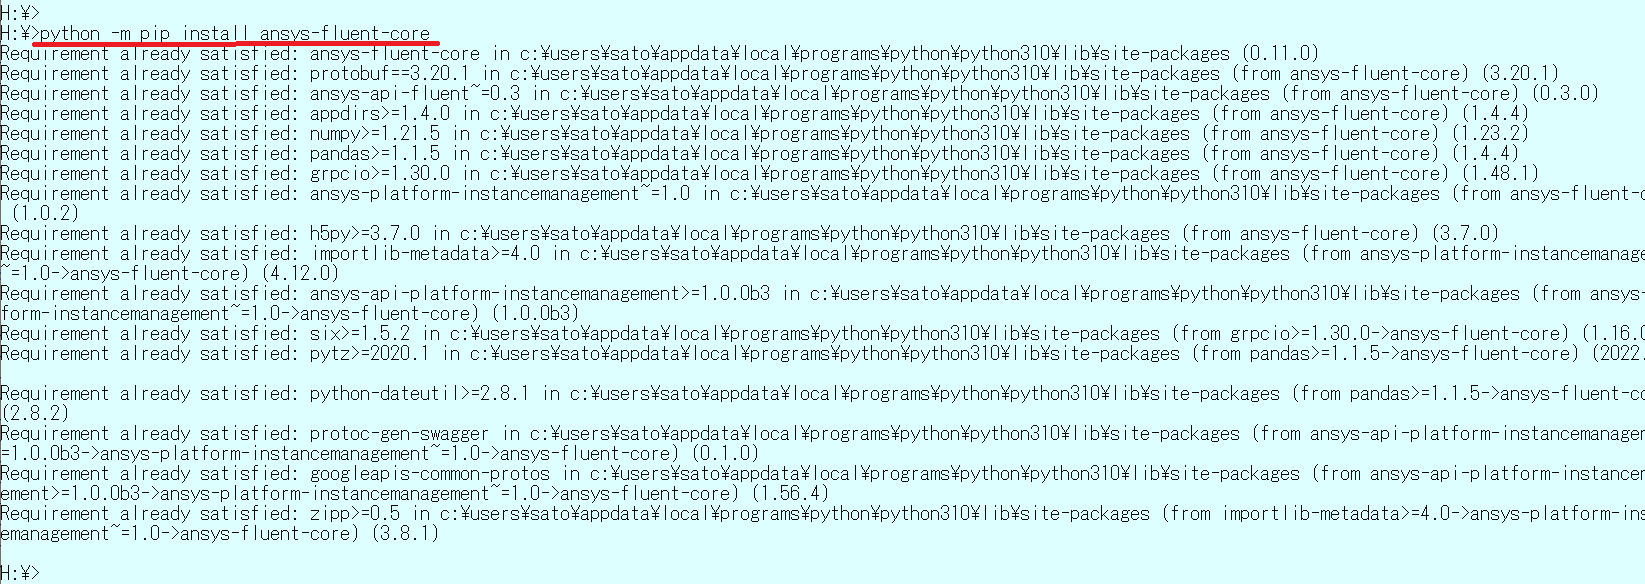
次にPyFluentをインストールします。コマンドプロンプトから以下のように入力してください。
python -m pip install ansys-fluent-core
PyFluentを動かしてみる
それでは、
https://fluent.docs.pyansys.com/getting_started/index.html
を参考にして、PyFluentを動かしてみます。
コマンドプロンプトからpythonを起動します。pythonのプロンプト>>>から以下のコマンドを入力します。
import ansys.fluent.core as pyfluent
solver = pyfluent.launch_fluent(precision="double", processor_count=2, mode="solver")
solver.check_health()
これで、python内から、fluentのソルバーモジュールが起動します(倍精度版、2並列)。

これで、fluentの起動が確認できたので、ここでは、何もせずに終了してみます。
pythonプロンプトから以下のコマンドを入力します。
その後コントロール+Zキーを入力するとpythonが終了して、ウインドウズのコマンドプロンプトに戻ってきます。
solver.exit()

それでは、mixing elbowの例題を動かしてみます。
ここでは、予めメッシュが作成されているものとします。
(ページ下のsample.zipに含まれます)
PyFluentの実行モード
PyFluentには2つの実行モードがあります。
-
TUIオブジェクトモード
これは、従来のfluentのTUIコマンドをそのまま、PyFluentのコマンド記述に変換して実行するモードです。 このモードを使えば、過去に作成したfluent用のジャーナルファイルを、PyFluent用のコマンドに変換して実行することができます。 -
設定オブジェクトモード
これは、fluentの設定を独自のインターフェイスを使って設定する方法です。 設定の記述方法は、APIインターフェイスのマニュアルなどを参考にして記述する必要がありますが、直感的でわかりやすい記述が可能になります
これらの実行モードを混在させて記述することも可能です。
PyFluentでは、pythonの枠組みの中でコマンドを記述することができるため、反復処理や条件分岐なども行うことが可能になります。
❗ 従来のジャーナルファイルではこのような操作は不可能でした。
以下ではTUIモードを使って、fluentを実行した例を示します。
mixng elbowの計算
低温流体に高温流体が合流する計算を行ってみます。
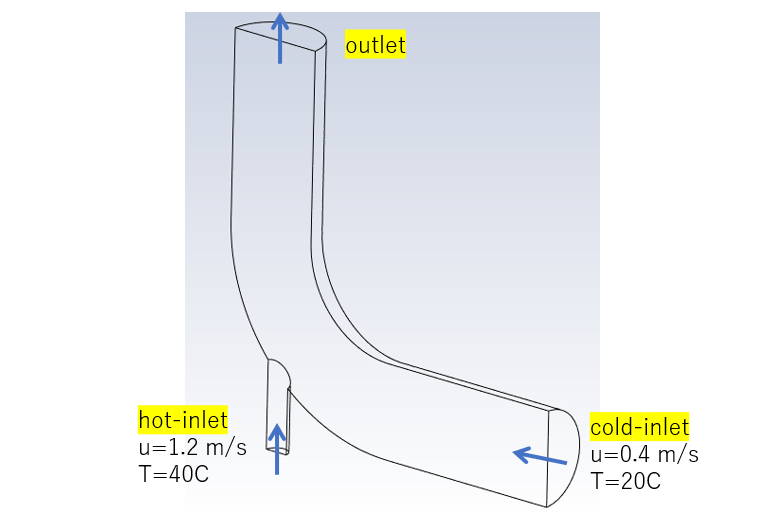 mixng elbowのモデル
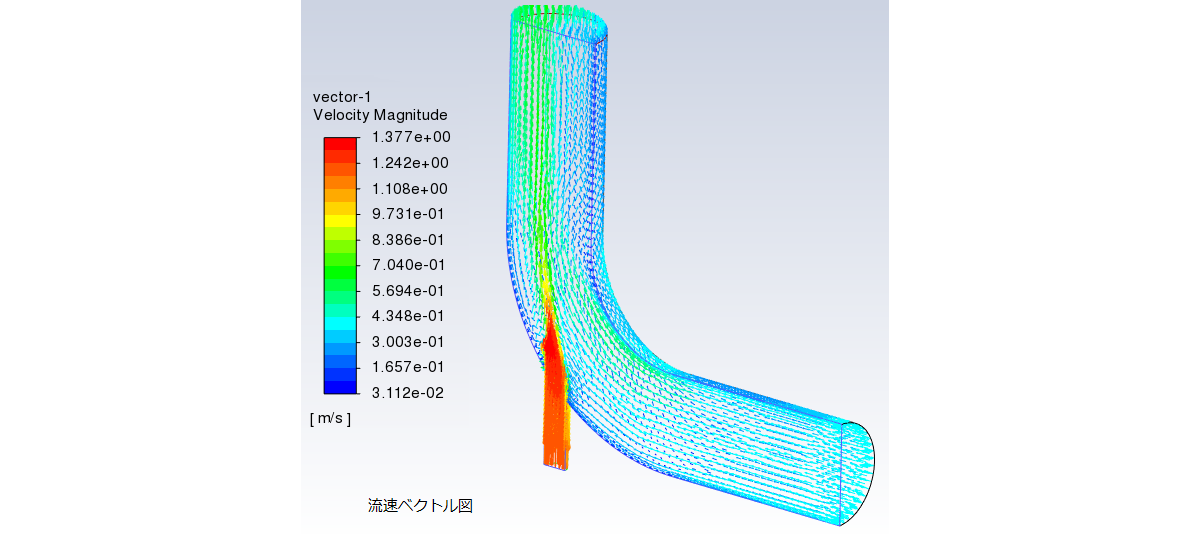 流速ベクトル図
 温度コンター図
ジャーナルファイルを使ったfluentの実行(従来手法)
従来の手順で、fluentをバッチ処理で実行するためのジャーナルファイルを作成します。
以下の内容を sample.jou という名前のファイルで保存します。
;
; mesh データを読み込む
rc elbow.msh.h5 y
;
; 計算に使用する温度の単位を℃にする
define unit temperature C
;
; 温度場を計算するように指定
define model energy y n n n y
;
; 流体物性値を water-liquid にする
define mate copy fluid water-liquid
;
; 流体セル条件を設定する
define boundary-condition fluid fluid y water-liquid , , , , , , , , , , , , , , , , , , , ,
;
; 境界条件を設定する
;
; 実際には以下のように全パラメータを一括して入力可能であるがここでは使わない
;;; defi bc velocity-inlet cold-inlet n n y y n 0.4 n 0 n 293.15 n n n y 5 0.1016
; 流入境界条件(cold-inlet)
defi bc set velocity-inlet cold-inlet () vmag no 0.4 quit
defi bc set velocity-inlet cold-inlet () ke-spec no no no yes quit
defi bc set velocity-inlet cold-inlet () turb-intensity 5 quit
defi bc set velocity-inlet cold-inlet () turb-hydraulic-diam 0.1016 quit
defi bc set velocity-inlet cold-inlet () temperature no 20 quit
;
; 実際には以下のように全パラメータを一括して入力可能であるがここでは使わない
;;;defi bc velocity-inlet hot-inlet n n y y n 1.2 n 0 n 313.15 n n n y 5 0.0254
; 流入境界条件(hot-inlet)
defi bc set velocity-inlet hot-inlet () vmag no 1.2 quit
defi bc set velocity-inlet hot-inlet () ke-spec no no no yes quit
defi bc set velocity-inlet hot-inlet () turb-intensity 5 quit
defi bc set velocity-inlet hot-inlet () turb-hydraulic-diam 0.0254 quit
defi bc set velocity-inlet hot-inlet () temperature no 40 quit
;
; 実際には以下のように全パラメータを一括して入力可能であるがここでは使わない
;;;defi bc pressure-outlet outlet y n , , , , , n n y 5 4 , , , ,
; 流出境界条件(outlet)
defi bc set pressure-outlet outlet () turb-intensity 5 quit
defi bc set pressure-outlet outlet () turb-viscosity-ratio 4 quit
;
; 初期化を行う
solv initialize hyb-init
;
; 100回の反復計算を実施
solve iterate 100
;
; 計算結果ファイルを保存
file write-case-data raw.cas.h5 y
;
; fluentを終了する
exit
;
このファイルを使い、fluentをバッチ処理で実行します。
コマンドラインから以下を入力します。これは三次元、倍精度版のfluentを2並列で実行しています。
fluent 3ddp -t2 -gu -driver null -i sample.jou
実行時のメッセージが画面に表示されます。
              Welcome to ANSYS Fluent 2022 R2

              Copyright 1987-2022 ANSYS, Inc. All Rights Reserved.
              Unauthorized use, distribution or duplication is prohibited.
              This product is subject to U.S. laws governing export and re-export.
              For full Legal Notice, see documentation.

Build Time: May 27 2022 08:52:58 EDT  Build Id: 10212

Connected License Server List:  1055@192.168.200.18

*********************************************
Info: Your license enables 4-way parallel execution.
For faster simulations, please start the application with the appropriate parallel options.
*********************************************

Host spawning Node 0 on machine "beaver" (win64).

*********************************************
Info: Your license enables 4-way parallel execution.
For faster simulations, please start the application with the appropriate parallel options.
*********************************************


-------------------------------------------------------------------------------
ID    Hostname  Core  O.S.         PID    Vendor
-------------------------------------------------------------------------------
n1    beaver    2/20  Windows-x64  17020  Intel(R) Xeon(R) E5-2698 v4
n0*   beaver    1/20  Windows-x64  16452  Intel(R) Xeon(R) E5-2698 v4
host  beaver          Windows-x64  9692   Intel(R) Xeon(R) E5-2698 v4

MPI Option Selected: intel
Selected system interconnect: default
-------------------------------------------------------------------------------


Cleanup script file is F:\FL-tutorial\Fluent_Tutorial_Package\introduction\introduction\\cleanup-fluent-beaver-20136.bat

Reading journal file sample.jou...

> ;
; mesh データを読み込む
rc elbow.msh.h5 Fast-loading "C:\PROGRA~1\ANSYSI~1\v222\fluent\fluent22.2.0\\addons\afd\lib\hdfio.bin"
Done.
Multicore processors detected. Processor affinity set!

Reading from beaver:"F:\FL-tutorial\Fluent_Tutorial_Package\introduction\introduction\elbow.msh.h5" in NODE0 mode ...
  Reading mesh ...
       17926 cells,     1 cell zone  ...
          17926 mixed cells,  zone id: 87
       92327 faces,     7 face zones ...
           2168 polygonal wall faces,  zone id: 34
            268 polygonal wall faces,  zone id: 33
            155 polygonal pressure-outlet faces,  zone id: 32
            152 polygonal velocity-inlet faces,  zone id: 31
             55 polygonal velocity-inlet faces,  zone id: 30
           2001 polygonal symmetry faces,  zone id: 29
          87528 mixed interior faces,  zone id: 89
       66949 nodes,     3 node zones ...

Building...
     mesh
        distributing mesh
                parts..,
                faces..,
                nodes..,
                cells..,
        bandwidth reduction using Reverse Cuthill-McKee: 7339/448 = 16.3817
     materials,
     interface,
     domains,
     zones,
        Skipping thread 20 of domain 1 (not referenced by grid).
        Skipping thread 21 of domain 1 (not referenced by grid).
        Skipping thread 22 of domain 1 (not referenced by grid).
        Skipping thread 23 of domain 1 (not referenced by grid).
        Skipping thread 24 of domain 1 (not referenced by grid).
        Skipping thread 25 of domain 1 (not referenced by grid).
        Skipping thread 26 of domain 1 (not referenced by grid).
        Skipping thread 27 of domain 1 (not referenced by grid).
        Skipping thread 28 of domain 1 (not referenced by grid).
        wall-elbow
        wall-inlet
        outlet
        cold-inlet
        hot-inlet
        symmetry-xyplane
        interior--fluid
        fluid
     parallel,
Done.
Mesh is now scaled to meters.
y
invalid command [y]

> ;
; 計算に使用する温度の単位を℃にする
define unit temperature C

> ;
; 温度場を計算するように指定
define model energy y n n n y

> ;
; 流体物性値を water-liquid にする
define mate copy fluid water-liquid

water-liquid copied from database.


> ;
; 流体セル条件を設定する
define boundary-condition fluid (fluid)
fluid y water-liquid , , , , , , , , , , , , , , , , , , , ,

> ;
; 境界条件を設定する
;
; 実際には以下のように全パラメータを一括して入力可能であるがここでは使わない
;;; defi bc velocity-inlet cold-inlet n n y y n 0.4 n 0 n 293.15 n n n y 5 0.1016
; 流入境界条件(cold-inlet)
defi bc set velocity-inlet cold-inlet () vmag no 0.4 quit

> defi bc set velocity-inlet cold-inlet () ke-spec no no no yes quit

> defi bc set velocity-inlet cold-inlet () turb-intensity 5 quit

> defi bc set velocity-inlet cold-inlet () turb-hydraulic-diam 0.1016 quit

> defi bc set velocity-inlet cold-inlet () temperature no 20 quit

> ;
; 実際には以下のように全パラメータを一括して入力可能であるがここでは使わない
;;;defi bc velocity-inlet hot-inlet n n y y n 1.2 n 0 n 313.15 n n n y 5 0.0254
; 流入境界条件(hot-inlet)
defi bc set velocity-inlet hot-inlet () vmag no 1.2 quit

> defi bc set velocity-inlet hot-inlet () ke-spec no no no yes quit

> defi bc set velocity-inlet hot-inlet () turb-intensity 5 quit

> defi bc set velocity-inlet hot-inlet () turb-hydraulic-diam 0.0254 quit

> defi bc set velocity-inlet hot-inlet () temperature no 40 quit

> ;
; 実際には以下のように全パラメータを一括して入力可能であるがここでは使わない
;;;defi bc pressure-outlet outlet y n , , , , , n n y 5 4 , , , ,
; 流出境界条件(outlet)
defi bc set pressure-outlet outlet () turb-intensity 5 quit

> defi bc set pressure-outlet outlet () turb-viscosity-ratio 4 quit

> ;
; 初期化を行う
solv initialize hyb-init

Initialize using the hybrid initialization method.

Checking case topology...
-This case has both inlets & outlets
-Pressure information is not available at the boundaries.
 Case will be initialized with constant pressure

        iter            scalar-0

        1               1.000000e+00
        2               1.780227e-04
        3               1.107499e-05
        4               1.007735e-05
        5               1.812284e-06
        6               2.095733e-06
        7               3.357642e-07
        8               3.430188e-07
        9               7.986486e-08
        10              7.907677e-08

Hybrid initialization is done.

> ;
; 100回の反復計算を実施
solve iterate 100

  iter  continuity  x-velocity  y-velocity  z-velocity      energy           k       omega     time/iter
     1  1.0000e+00  4.0985e-03  4.5004e-03  1.1471e-03  8.5794e-05  9.7387e-02  6.9686e-01  0:00:00   99
     2  8.1117e-01  2.4887e-03  3.0691e-03  7.0680e-04  9.9439e-05  5.4710e-02  9.6479e-02  0:00:00   98
     3  7.8097e-01  1.5850e-03  2.2764e-03  5.9967e-04  1.0685e-04  2.0056e-02  6.1342e-02  0:01:37   97
     4  7.4163e-01  1.0646e-03  1.9651e-03  4.9103e-04  1.1567e-04  1.7165e-02  3.8916e-02  0:01:17   96
     5  7.0518e-01  9.0080e-04  1.8120e-03  4.2748e-04  1.2140e-04  1.5986e-02  2.6639e-02  0:01:01   95
     6  6.4884e-01  8.5142e-04  1.7046e-03  3.8934e-04  1.2434e-04  1.5743e-02  2.0323e-02  0:00:48   94
     7  5.8720e-01  8.0079e-04  1.6430e-03  3.6185e-04  1.2366e-04  1.6039e-02  1.6962e-02  0:00:38   93
     8  5.3345e-01  7.4508e-04  1.5736e-03  3.3666e-04  1.2100e-04  1.6762e-02  1.4295e-02  0:00:49   92
     9  4.8694e-01  6.9969e-04  1.5085e-03  3.1588e-04  1.1569e-04  1.7573e-02  1.2290e-02  0:00:38   91
    10  4.5336e-01  6.6981e-04  1.4435e-03  2.9811e-04  1.0840e-04  1.7947e-02  1.0621e-02  0:00:30   90
    11  4.1934e-01  6.4088e-04  1.3639e-03  2.8312e-04  9.8945e-05  1.7892e-02  9.2594e-03  0:00:24   89

  iter  continuity  x-velocity  y-velocity  z-velocity      energy           k       omega     time/iter
    12  3.8914e-01  6.1348e-04  1.2803e-03  2.6996e-04  8.8244e-05  1.7451e-02  8.2087e-03  0:00:19   88
    13  3.6166e-01  5.8488e-04  1.1864e-03  2.5792e-04  7.6568e-05  1.6601e-02  7.3157e-03  0:00:32   87

(中略)

    92  1.2440e-03  6.1890e-07  1.2977e-06  4.7261e-07  1.6087e-08  6.9823e-06  5.6636e-06  0:00:01    8
    93  9.2169e-04  5.2974e-07  1.1298e-06  4.1066e-07  1.2747e-08  6.0690e-06  4.3409e-06  0:00:01    7
!   93 solution is converged

> ;
; 計算結果ファイルを保存
file write-case-data raw.cas.h5 y

Writing to beaver:"F:\FL-tutorial\Fluent_Tutorial_Package\introduction\introduction\raw.cas.h5" in NODE0 mode and compression
 level 1 ...
Warning: reading 4 partition grid onto 2 compute node machine.
         Combining every 2 partitions.
  Done.       17926 cells,     1 zone  ...
       92327 faces,     7 zones ...
       66865 nodes,     1 zone  ...
  Done.
Done.

Writing to beaver:"F:\FL-tutorial\Fluent_Tutorial_Package\introduction\introduction\raw.dat.h5" in NODE0 mode and compression
 level 1 ...
  Writing results.
Done.

> ;
; fluentを終了する
exit
93回の反復で計算が終了しました。
この計算結果を使い、ポスト処理を行うことが可能になります。
PyFluentを使った fluentの実行(TUIモード)
次に、同じ内容の計算をPyFluentを使って実行してみます。
前述の ジャーナルファイルを TUIモードを使い、PyFluentのコマンドに変換します。
以下の内容を sample.py という名前でファイルに保存します。
なお、 fluentのTUIでは、コマンドの階層構造を省略したり、コマンド文字を省略したりすることができますが、 PyFluentではこのような記述は不可なので、行儀よく階層構造に従い正しくコマンド文字を記述するようにします。
# fluent (3次元、倍精度版) を 2並列で起動する
import ansys.fluent.core as pyfluent
solver = pyfluent.launch_fluent(precision='double', version='3d', processor_count=2, mode="solver")

# mesh データを読み込む
solver.tui.file.read_case('elbow.msh.h5')

# mesh のチェックを行う
solver.tui.mesh.check()

# 計算に使用する温度の単位を℃にする
solver.tui.define.units("temperature", "C")

# 温度場を計算するように指定
solver.tui.define.models.energy(
   "yes", "no", "no", "no", "yes"
   )

# 流体物性値を water-liquid にする
solver.tui.define.materials.copy( "fluid", "water-liquid" )

# 流体セル条件を設定する
solver.tui.define.boundary_conditions.fluid(
   "fluid", "yes", "water-liquid", ",", ",", ",", ",", ",", ",", ",", ",", ",", ",", ",", ",", ",", ",", ",", ",", ",", ",", ",", ","
   )

# 境界条件を設定する
# ただしtuiコマンドを機械的に置き換えた以下の記述ではエラーが出る(多分省略記法を使っているため)
# そのため、正しい表記法(コマンド階層)に従って設定する

#solver.tui.define.boundary_conditions.velocity_inlet(
#   "cold-inlet", "n", "n", "y", "y", "n", "0.4", "n", "0", "n", "20", "n", "n", "n", "y", "5", "0.1016"
#   )
#solver.tui.define.boundary_conditions.velocity_inlet(
#   "hot-inlet", "n", "n", "y", "y", "n", "1.2", "n", "0", "n", "40", "n", "n", "n", "y", "5", "0.0254"
#   )

# 流入境界条件(cold-inlet)
solver.tui.define.boundary_conditions.set.velocity_inlet(
    "cold-inlet", [], "vmag", "no", 0.4, "quit"
)
solver.tui.define.boundary_conditions.set.velocity_inlet(
    "cold-inlet", [], "ke-spec", "no", "no", "no", "yes", "quit"
)
solver.tui.define.boundary_conditions.set.velocity_inlet(
    "cold-inlet", [], "turb-intensity", 5, "quit"
)
solver.tui.define.boundary_conditions.set.velocity_inlet(
    "cold-inlet", [], "turb-hydraulic-diam", 0.1016, "quit"
)
solver.tui.define.boundary_conditions.set.velocity_inlet(
    "cold-inlet", [], "temperature", "no", 20, "quit"
)

# 流入境界条件(hot-inlet)
solver.tui.define.boundary_conditions.set.velocity_inlet(
    "hot-inlet", [], "vmag", "no", 1.2, "quit"
)
solver.tui.define.boundary_conditions.set.velocity_inlet(
    "hot-inlet", [], "ke-spec", "no", "no", "no", "yes", "quit"
)
solver.tui.define.boundary_conditions.set.velocity_inlet(
    "hot-inlet", [], "turb-intensity", 5, "quit"
)
solver.tui.define.boundary_conditions.set.velocity_inlet(
    "hot-inlet", [], "turb-hydraulic-diam", 0.0254, "quit"
)
solver.tui.define.boundary_conditions.set.velocity_inlet(
    "hot-inlet", [], "temperature", "no", 40, "quit"
)

# 流出境界条件(outlet)
solver.tui.define.boundary_conditions.set.pressure_outlet(
    "outlet", [], "turb-intensity", 5, "quit"
)
solver.tui.define.boundary_conditions.set.pressure_outlet(
    "outlet", [], "turb-viscosity-ratio", 4, "quit"
)

# 初期化を行う
solver.tui.solve.initialize.hyb_initialization()

# 100回の反復計算を実施
solver.tui.solve.iterate(100)

# 計算結果ファイルを保存
solver.tui.file.write_case("pyfl.cas.h5")
solver.tui.file.write_data("pyfl.dat.h5")

# pythonを終了する
solver.exit()
この pythonスクリプトを使い、fluentを実行してみます。コマンドプロンプトから以下のコマンドを入力します。
python sample.py
これにより上記の TUIモードと同じ出力メッセージが、画面に表示されます。
まとめ
簡単な例を使って PyFluentを実行してみました。
fluentをpythonの中からコントロールできることになるため、色々と応用ができそうです。
ここでは紹介していませんが、メッシュ作成、ポスト処理、パラメータ最適化などについても別のpythonモジュールとして開発が行われています。
また、PyFluentは、PyAnsysというモジュールの一部を構成しており、もし使用ソフトのライセンスを有しているのであれば、構造解析や電磁場解析との連成も可能になります。
なおPyFluentは、オープンソースとして Github上で開発されており、MITライセンスで使用できます。githubへのリンクは以下になります。
もし、必要ならば自分でソースプログラムをダウンロードしてカスタマイズ版を作ることも可能です。
プログラミングに自信がある方は一度試してみてはいかがでしょうか?
上の例題で使用したデータ(elbow.msh.h5, sample.jou, sample.py)は以下からダウンロードできます。
続編の
もご覧ください。
弊社の解析事例
弊社の流体解析事例については、下記のリンクからご覧ください.