ブランコに乗った水槽
By M.Sato
概要
物体が移動している状況をシミュレーションしているとする。 その際に物体に固定された座標系に基づき計算結果を評価したい場合があるはずである。 例えば移動しているタンクの自由表面形状を、タンクに固定された座標系に基づき表示する場合などである。 Ansys Fluentでは解析対象が空間を移動する現象を扱うことが可能である。 ここでは、ブランコに乗った水槽を対象として局所座標から見た自由表面形状を再現する方法を紹介する。
解析モデル
 モデル
モデル
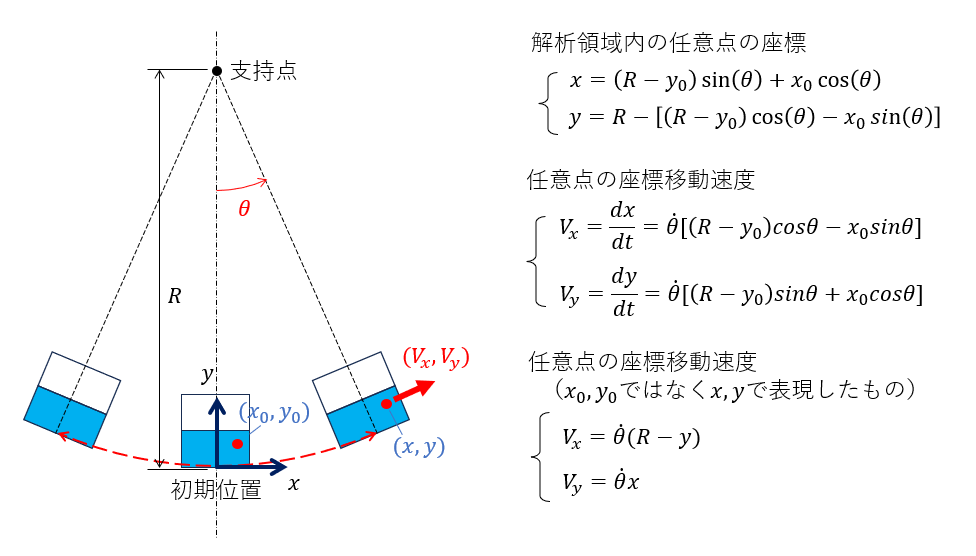
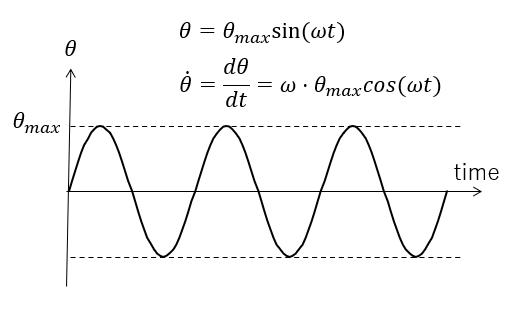
長さRの棒の下端に水槽が固定されている。 時刻ゼロにおいて水槽は支持点の直下に位置している。 支持点を中心として水槽が左右に振動する。 その振動パターン(時間関数)は下図のように規定されているものとする。
 時間関数
時間関数
実際の計算で使用したパラメータを示す。
- 半径: $R=4 [m]$
- 周期:$T=8 [sec]$
- 角周波数:$\omega = 2\pi/T = 0.7854 [rad/sec]$
- 最大傾斜角:$\theta_{max} = 30 [deg]$
メッシュ分割
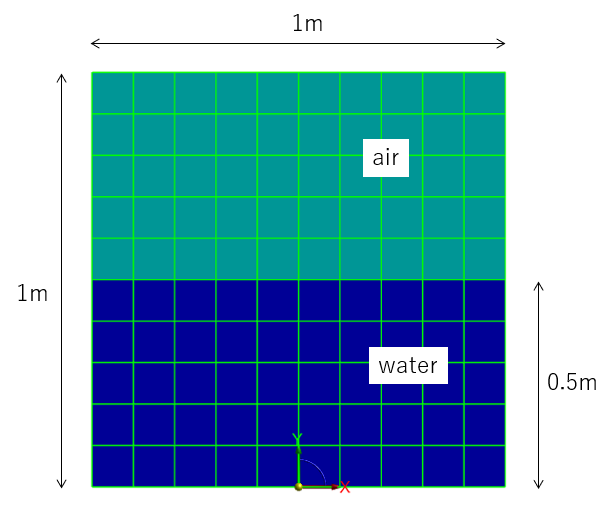
大きさ 1m×1mの箱に水深0.5mまで水が入っているとしてメッシュを作成した。
 メッシュ
メッシュ
物性値
ここでは、密度$\rho$および粘度$\mu$を以下に示す値で設定した。
- 空気密度:$\rho_{air} = 1.2 [kg/m^3]$
- 空気粘度:$\mu_{air} = 1.8\times10^{-5} [Pa.s]$
- 水密度:$\rho_{water} = 1000 [kg/m^3]$
- 水粘度:$\mu_{water} = 1.0\times10^{-3} [Pa.s]$
ダイナミックメッシュ
DEFINE_CG_MOTIONを使い、メッシュの移動を表現した。
以下にUDFのソースプログラム(fl-pendulum.c)を示す。 また重力の影響は DEFINE_SOURCE を使い体積力で指定した。
#include "udf.h"

#define RADIUS  4.0  /* [m] */
#define PERIOD  8.0  /* [sec] */
#define OMG     (2.0*M_PI/PERIOD)   /* [rad/sec] */

#define ANGLEMAX  30.0   /* [deg] */
#define THETAMAX  (ANGLEMAX*M_PI/180.0)  /* [rad] */

#define GRAV   9.81  /* [m/sec^2] */

/************************************************************/
DEFINE_CG_MOTION(pendulum,dt,vel,omega,time,dtime)
/************************************************************/
{
   real theta,omgt,thetadot;

   omgt = OMG*time;
   theta = THETAMAX * sin(omgt);

   thetadot = THETAMAX * OMG * cos(omgt);

   vel[0] = RADIUS * cos(theta) * thetadot;
   vel[1] = RADIUS * sin(theta) * thetadot;
   vel[2] = 0;

   omega[0] = 0;
   omega[1] = 0;
   omega[2] = thetadot;
}

/************************************************************/
DEFINE_SOURCE(gravy, c, t, dS, eqn)
/************************************************************/
{
   real theta,source;

   source = - C_R(c,t) * GRAV;

   dS[eqn] = 0;
   return source;
}
DEFINE_CG_MOTION関数の引数の説明は以下の通りである。
- pendulum: fluent内での関数表示名
- dt: ダイナミックメッシュ属性の構造体ポインター
- vel: 線速度
- omega: 角速度
- time: 現在時刻
- dtime: 時間ステップ
velにはメッシュの移動速度(円の接線速度)、omegaには 回転角速度 $d \theta / d t$ を指定している。 これら時間の関数である。
計算実行
解析に必要な設定は一般のVOF解析と同様であるため、ここでは詳細は説明しない。 最終的に、時間刻み幅を 0.002 [sec]として4000ステップの実行を行った(=8sec)。 なお、計算実行後に結果図を作成するために、ステップ数20ごとに結果ファイルを保存するようにした。
計算結果
計算結果ファイルを読み込んで、流速ベクトル図および自由表面形状図を作成した(時刻t=0.04, 2, 4, 6[sec])。 以下に計算結果を示す。
局所座標系で表示した結果図はタンクに固定された座標系から見た流れの様子になっている。 局所座標系で結果を表示する方法は、次節で詳細に説明する。
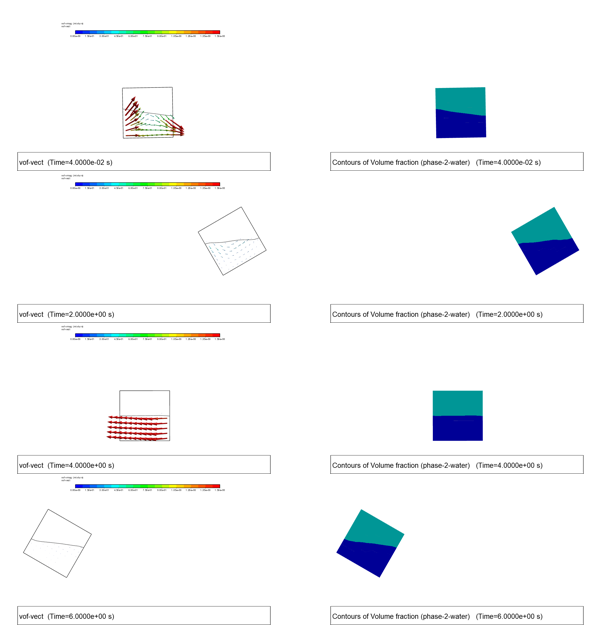 流速ベクトル&自由表面形状(全体座標系で表示したもの)
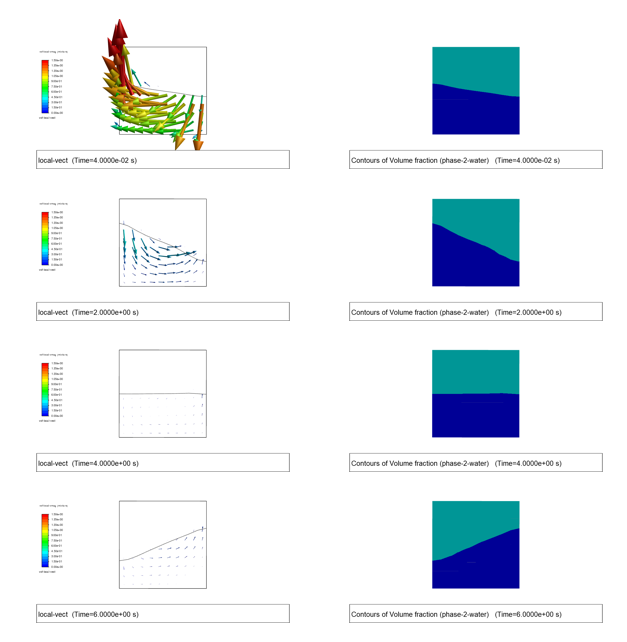 流速ベクトル&自由表面形状(局所座標系で表示したもの)
流速ベクトル(全体座標系)
自由表面形状(全体座標系)
流速ベクトル(局所座標系)
自由表面形状(局所座標系)
局所座標系に基づく結果の表示
移動する座標系から見た場合の計算結果の表示には、二種類の操作が必要である。
- モデル形状の表示位置、角度などの調整(カメラの指定)
- 全体座標系の流速ベクトルから座標系の移動速度を引く(局所流速作成)
fluentでは、cameraコマンドで表示位置を調整することができる。
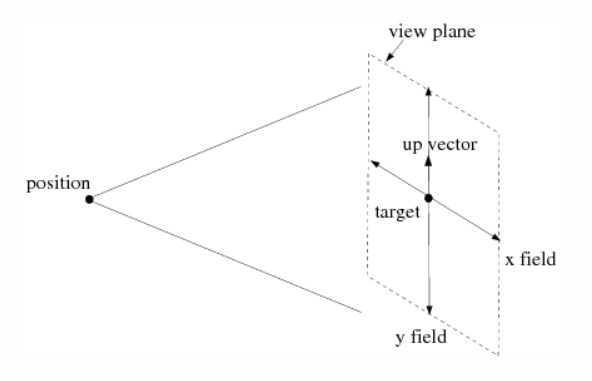 カメラ
カメラ
- “position"の位置
($x_{ini},y_{ini}$)は適切に表示されるように試行錯誤で決定
$(x_{ini},y_{ini})=(0,0.57)$
$x_c = (R-y_{ini})sin(\theta) + x_{ini}cos(\theta)$
$y_c = R- [ (R-y_{ini})cos(\theta) - x_{ini}sin(\theta) ]$
- “target"の位置
$x_c$, $y_c$は “position"と同じ、z座標値を適当な正値で指定(平行投影のため)
- “upvector"の計算
$up_x = -sin(\theta)$
$up_y = cos(\theta)$
- field範囲
x-field=1.5, y-field=1.5 と指定
局所流速はユーザ定義フィールド変数で定義する。
- “タンク移動速度” (座標点x,yでの値)
$v_{tank,x} = \dot{\theta} (R-y)$
$v_{tank,y} = \dot{\theta} x$
- “局所座標系の流速” ($u_{global}$はfluentの計算値)
$u_{local,x} = u_{global,x} - v_{tank.x} =u_{global,x} - \dot{\theta} (R-y)$
$u_{local,y} = u_{global,y} - v_{tank.y} = u_{global,y} - \dot{\theta} x$
ユーザ定義フィールド変数の作成
ポスト処理用にいくつかのフィールド変数を定義しておく(単なるスカラー値の変数もあるが、利便性を考慮してこれらもフィールド変数にしている)。
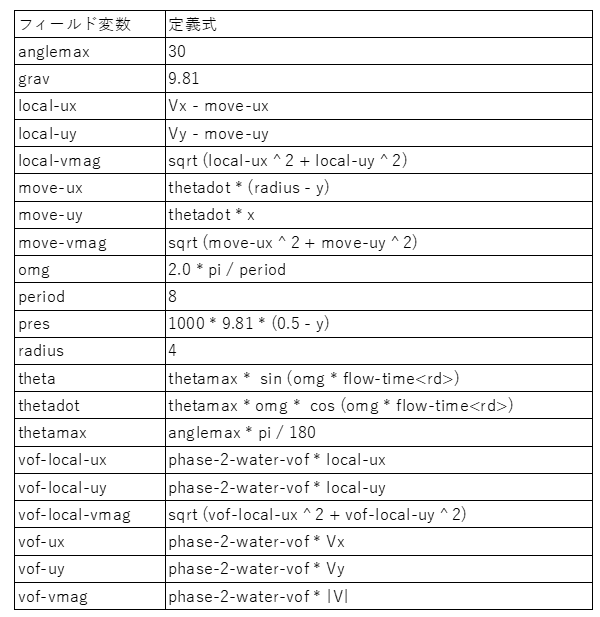 ユーザ定義フィールド変数
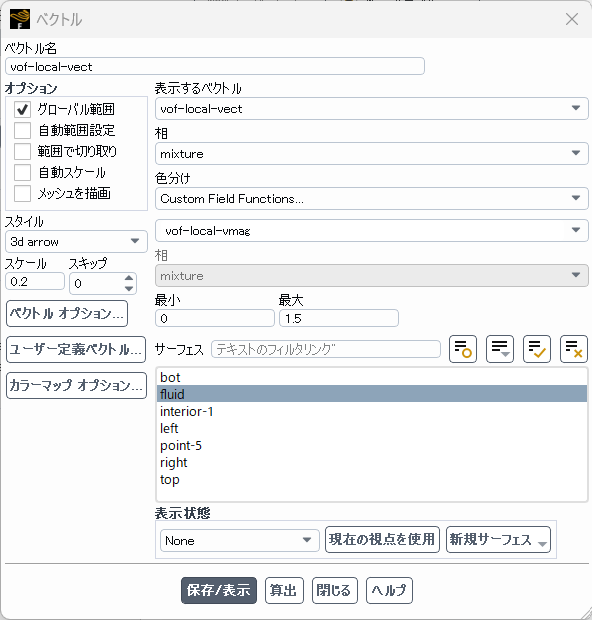
作図オブジェクトの登録
結果図を作図するためのグラフィックオブジェクトを予め作成しておく。 例えば、“water"部分での局所流速場を “sc-local-vect"というグラフィックオブジェクトで表示している。
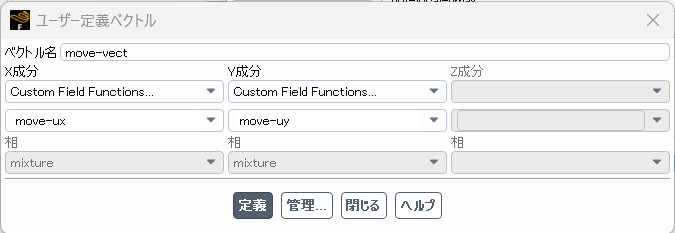 move-vect
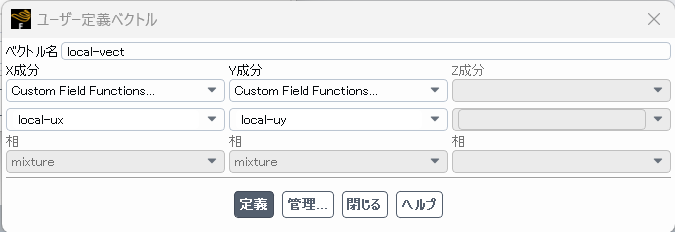 local-vect
 vof-local-vect
各種のベクトル場の作成
 vof-local-vect-form
図表示コマンドの作成 sc-local-vect
シーンとして表示(外形線、自由表面形状と重ね合わせ)
ビューの登録
全体系座標は"view-0"で設定、局所座標系は cameraコマンド(時間と共に位置が変化する)で設定する。
schemeについて
ここでは、ポスト処理を行うためにschemeコマンドを使用した。 schemeの文法は、凝った操作を行わない限り比較的簡単である。 ポスト処理で使用する場合には、fluentのTUIコマンドを同等のscheme記述に変換して実行すればよい。 以下では、簡単にschemeの文法を紹介する。
基本
schemeはLispの方言であり、基本的に以下の記述に従う。
(command1 argument1 argument2 ...)
ここで command1, argument1, …は英字で始まる名前であり、
(a-z) (0-9) + - * / < > = ? . : % $ ! ~ ^ _
などの文字が使用可能である。
“;“以降の文字はコメントとして扱われる。
変数
schemeにはグローバル変数とローカル変数がある。変数タイプの宣言は不要である。 グローバル変数の定義には define を使用する(グローバル変数の再定義にはset!を使用)。 ローカル変数は、let で定義する。
> (define x 10) ; Defines a global variable
> (set! x 20) ;Set! for redefinitions of global variables
> (display x) ; Prints the value of the variable on the prompt
20
> (let ((x 2) (y 3)) (* x y))
6
displayで変数値を見ることができる。
fluentに組込のscheme環境には、fluent内で定義された全ての変数、関数が含まれている。
> (define a1 #t) ; Define the variable as: true
> (define a2 #f) ; Define the variable as: false
> (define c1 #\A) ; Define the variable as the uppercase letter : A
> (define d1 "teststring") ; Define the variable as the string : teststring
> (define e1 ’testsymbol ) ; Define the variable as the symbol : testsymbol
> (symbol-bound? ’e1 (the-environment)) ;Check , if variable e1 is bound
#t
> (symbol-assigned? ’e1 (the-environment)) ;Check , if variable e1 is assigned (contains a value)
#t
全ての"RP"変数はモデルに関連した変数であり、casファイル内に定義されている。 これらの変数は以下のようにして読み書きすることができる。
> (rpgetvar ’time-step) ;時間ステップ番号を得る
0
> (rpsetvar ’time-step 0) ;時間ステップ番号を強制的に0に設定する
全ての"CX"変数はFluent環境に関連した変数であり、以下のようにして読み書きすることができる。
> (cxgetvar 'contour/filled?) ; 塗りつぶしコンター図の指定
#t
> (cxsetvar 'contour/filled? #f)
#f
数式演算
いくつかの数式演算の例を示す。
> (define x 10) ; Define variable x as 10
> (define y 20) ; Define variable y as 20
> (define z1 (+ x y)) ; Calculates x+y= 30
> (- x y) ; Calculate x-y= -10
> (* x y) ; Calculate x*y= 200
> (/ x y) ; Calculate x/y= 0.5
> (/ x y 4) ; Calculate x/y/4= 0.125
> (exp 2) ; Calculate e?2=7.389
> (expt 2 5) ; Calculate 2?5=32
> (log 7.389) ; Calculate log(7.389) =1.9999
> (sin 0) ; Calculate sin(0 rad) = 0, same for cos and tan
> (asin 1) ; Calculate arcsin(1) = pi/2, same for acos and atan
リスト
リストはschemeにおける基本的なタイプであり、一連のオブジェクトをスペースで区切りカッコで囲んだものである。
> (define l1 ’(a b c)) ; Define l1 as list with elements a, b and c
> (car l1) ; Return the first element of a list
> (cdr l1) ; Return all elements of a list , except the first
> (length l1) ; Return the length (3) of a list
> (list -ref l1 2) ; Return the second element of a list
条件分岐
特定の表現式を実行するかどうかを決めるためには、条件式が必要でありブール値が使われる。 schemeでは #tが真、 #fが偽を表す。
> (= a b) ;Check , if a and b are equal , use for numbers
> (< a b) ;Check , if a is less than b, use for numbers
> (<= a b) ;Check , if a is less than or equal to b, use for numbers
> (positive? a) ;Check , if a is a positive number , (also : zero? and negative?)
> (eqv? a b) ;Check , if values of a and b are equal , use for non-numeric values
> (eqal? a b) ;Check , if values of a and b are equal , use for lists , vectors etc.
> (not a) ; Invert logical value of a
> (and ((= 3 3) (eqv? a b))) ;#t, if 3 is equal to 3 AND values of a and b
> (or ((= 3 3) (eqv? a b))) ;#t, if 3 is equal to 3 OR values of a and b
> (if (< 2 3) ’yes ’no) ;If the test expression is #t, yes is returned otherwise no
> (if (< 2 3) ; Begin enables more than one expression per body
> (begin (+ 10 20) (+ 30 40)) ; True body
> (begin (+ 1 2) (+ 3 4))) ; False body
繰り返し
do-loopは以下のように記述する。これは初期値x1start、増分値x1delta、 で x1>x1end になるまで loop-body を実行することを表している。
(do ((x1 x1start (+ x1 x1delta))) ((> x1 x1end)) ... loop-body ... )
> (do ((x1 1 (+ x1 1))) ; カウンターx1の初期値、増分値を定義
((> x1 5)) ; 終了条件を定義
(display (* x1 10))) ; 実行文を記述
1020304050
出力フォーマット
文字列を作成して変数の中に埋め込むために format手続きを使うことができる。
> (define sVariable1 "bananas")
> (define iVariable1 4)
> (define iVariable2 13)
> (define fpVariable1 0.001)
> (format "Monkeys like ?a." sVariable1) ; Insert sVariable1 in the string Monkeys like bananas.
> (format "Monkeys like ?a." "bananas") ; Insert "bananas" in the string Monkeys like bananas.
> (format "Monkeys like ?s." sVariable1) ; String specifier inserts the string with " into the string.
Monkeys like "bananas".
> (format "Elephants can reach a height of ?d meters/?d feet." iVariable1 iVariable2) ; Usage of more than one format specifier
Elephants can reach a height of 4 meters/13 feet.
> (format " Elephants can reach a height of ?02d meters/?04d feet." iVariable1 iVariable2 ) ; Fill zeros on the left side
Elephants can reach a height of 04 meters/0013 feet.
> (format "A millisecond is specified as ?f seconds." fpVariable1 ) ;Use a floating point variable with no extra specifications
A millisecond is specified as 0 seconds.
> (format "A millisecond is specified as ?4.3f seconds." fpVariable1 ) ;Specify explicitly 4 digits , 3 after the decimal
A millisecond is specified as 0.001 seconds.
format関数のパラメータは以下の内容になっている。
- ?a: 対応変数を “display"の表示と同様に出力
- ?s: 対応変数を “write"の表示と同様に出力
- ?d: 対応変数を整数として出力
- ?f: 対応変数を浮動小数点数として出力
- \n: 改行文字
- ?%: 改行文字
- \”: ” 文字
TUIコマンドの記述
fluentのTUIコマンドをschemeコマンドとして実行するためには “ti-menu-load-string"という関数を呼び出せばよい。 関数にパラメータを渡すためには、format関数の”~a"などの書式を使う。 以下に cameraのposition位置を定義する例を示す。二箇所の”~a"の部分にはxc, ycの値が代入される。
(ti-menu-load-string (format #f "/views/camera/position ~a ~a 1" xc yc) )
schemeファイルの作成例
ポスト処理で使用したschemeファイル(localview.scm)を以下に示す。 このschemeコマンドを使えば、複数の結果ファイルから一括して図出力を行うことが可能である。 なお、ゼロステップ目(初期状態)の計算結果は 予め初期データをコピーして作成した。
# 初期時刻データのコピー
cp vof.cas.h5  vof-1-00000.cas.h5
cp vof.dat.h5  vof-1-00000.dat.h5
 ;
 ;  ファイル localview.scm
 ;
(define maxstep 4000)
(define ident "vof")
(define head (string-append ident "-1-"))
(define tail ".h5")

; 計算結果読み込みのための無名関数を定義
(define rcd-step (lambda (step) (read-case-data (string-append head step tail))))


(define radius 4)
(define period 8)
(define anglemax 30)
(define pi 3.14159265358979)
(define twopi (* 2 pi))
(define thetamax (/ (* anglemax pi) 180))
(define omega    (/ twopi period))

; 初期基準点(position)座標 (cameraで使用)
(define xini 0.0)
(define yini 0.57)

; テキストボックス表示、文字サイズを拡大
(ti-menu-load-string (format #f "/disp/set/window/text/visible y") )
(ti-menu-load-string (format #f "/disp/set/window/text/date n") )
(ti-menu-load-string (format #f "/disp/set/window/text/application n") )
(cxsetvar 'frame/title/font (format #f "size=0.3wru"))


;;; -------------------------------------- 時間ステップループ
; (0ステップから4000ステップまで20ステップ刻み)
(do ((step 0 (+ step 20))) ((> step maxstep))
(define mystep (format #f "~05d" step))

; 計算結果ファイルの読み込み
(rcd-step mystep)


; 時刻データの取得
(define time (rpgetvar 'flow-time))

; theta, sin(theta), cos(theta)の計算
(define theta (* thetamax (sin (* omega time))))
(define sn (sin theta))
(define cs (cos theta))

; 角度theta回転後の(xini,yini)座標位置の計算
; xc = (R-yi)*sin + xi*cos
; yc = R - ((R-yi)*cos - xi*sin)
(define xc (+
             (* (- radius yini) sn)
             (* xini cs)
           ))
(define yc (- radius
               (-
                 (* (- radius yini) cs)
                 (* xini sn)
               )
            ))

; camera表示範囲、上向き方向の指定
(define fldx 1.5)
(define fldy 1.5)
(define upvx (- sn))
(define upvy cs)

; TUIコマンドを schemeコマンドに変換して実行
;;;;;;;;;;;;;;;;;;;;;;;;;;;;;;;;;;;;;;;;;;;;;;;;;;;;;;;;;;;;;;;;; vof
(ti-menu-load-string (format #f "/disp/obj/disp vof") )

(ti-menu-load-string (format #f "/views/camera/position  ~a ~a 1" xc yc) )
(ti-menu-load-string (format #f "/views/camera/target    ~a ~a 0" xc yc) )
(ti-menu-load-string (format #f "/views/camera/up-vector ~a ~a 0" upvx upvy) )
(ti-menu-load-string (format #f "/views/camera/field     ~a ~a  " fldx fldy) )
(ti-menu-load-string (format #f "/disp/save-pic/lvof-~05d.png" step) )

(ti-menu-load-string (format #f "/views/restore-view view-0" ) )
(ti-menu-load-string (format #f "/disp/save-pic/gvof-~05d.png" step) )

;;;;;;;;;;;;;;;;;;;;;;;;;;;;;;;;;;;;;;;;;;;;;;;;;;;;;;;;;;;;;;;;; vect
(ti-menu-load-string (format #f "/disp/obj/edit vof-local-vect scale auto-scale n scale-f 0.5 q q q") )
(ti-menu-load-string (format #f "/disp/obj/disp sc-local-vect") )

(ti-menu-load-string (format #f "/views/camera/position  ~a ~a 1" xc yc) )
(ti-menu-load-string (format #f "/views/camera/target    ~a ~a 0" xc yc) )
(ti-menu-load-string (format #f "/views/camera/up-vector ~a ~a 0" upvx upvy) )
(ti-menu-load-string (format #f "/views/camera/field     ~a ~a  " fldx fldy) )
(ti-menu-load-string (format #f "/disp/save-pic/lvect-~05d.png" step) )

(ti-menu-load-string (format #f "/disp/obj/edit vof-vect scale auto-scale n scale-f 0.2 q q q") )
(ti-menu-load-string (format #f "/disp/obj/disp sc-vect") )
(ti-menu-load-string (format #f "/views/restore-view view-0" ) )
(ti-menu-load-string (format #f "/disp/save-pic/gvect-~05d.png" step) )

)
schemeファイルの実行
fluentをGUIで起動し、メニューから File -> Read -> Scheme を選択し、schemeファイルを選択する。
別手法として、GUI画面下側に表示されたコンソールウインドウから、以下のように入力することも可能である。
; コンソールウインドウから実行する場合
(load "localview.scm")
まとめ
fluentの計算結果を、計算で使用した全体座標系ではなく局所座標系を使って表示する方法を紹介した。 schemeコマンドでは、一般のTUIコマンドでは、記述が難しい条件分岐、繰り返し処理などを含む ジャーナルファイルを作成することが可能であり、便利に使用することが可能である。
弊社の解析事例
弊社の流体解析事例については、下記のリンクからご覧ください.